Payment Options Setup
Buzzshot Bookings supports multiple payment providers and methods so your customers can pay however suits them best. This guide walks you through connecting your payment accounts and enabling the payment methods you need.
Payment methods are organized into three categories:
- Regular Payments -- Standard checkout methods your customers use when booking online (Stripe card payments, Square card payments)
- Express Payments -- Fast checkout options like Apple Pay and Google Pay that let customers pay with a single tap
- Staff Payment Options -- Methods your staff use when taking payments in person or over the phone (manual payments, card readers, telephone payments)
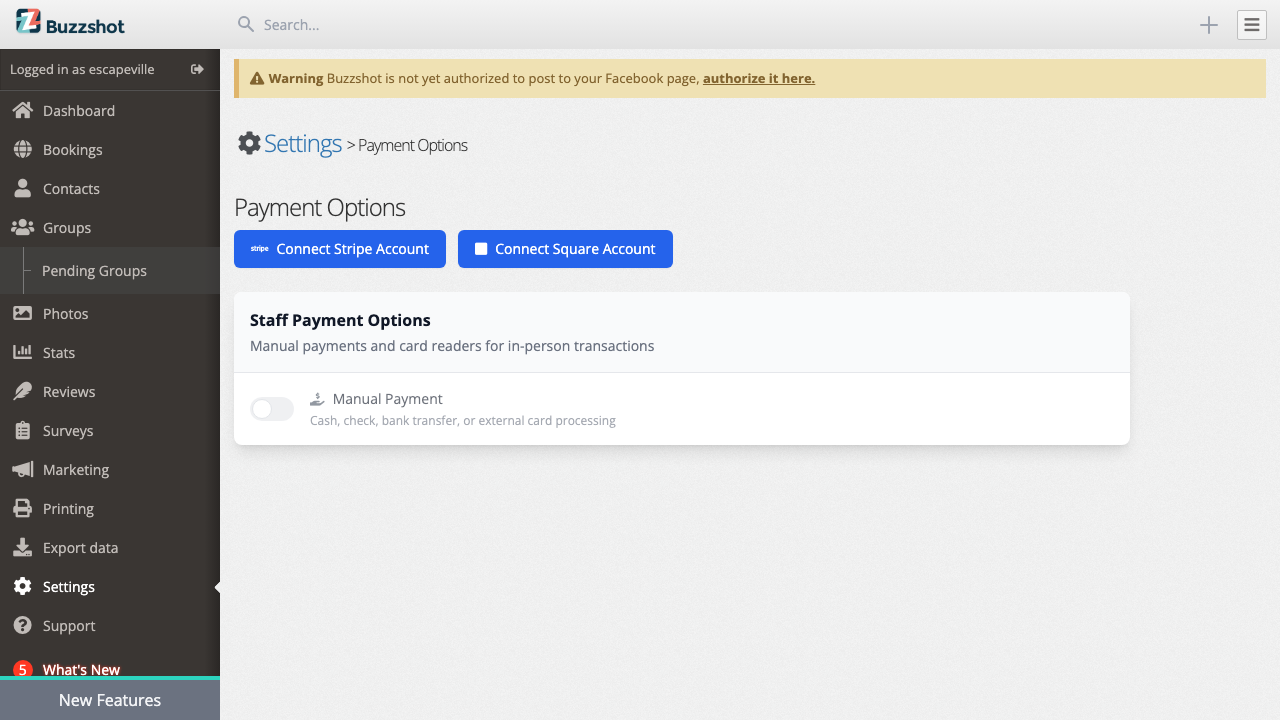
Getting to the Payment Options Page
- Log in to your Buzzshot admin panel
- Go to Settings from the main navigation
- Under the Bookings section, click Payment Options
You can also navigate directly to the payment options page.
If you have not connected a payment provider yet, you will see buttons to connect Stripe or Square, along with an empty state message.
Connecting a Payment Provider
Before you can accept card payments, you need to connect at least one payment provider account. Buzzshot currently supports Stripe and Square as payment providers. You can connect one or both.
Connecting Stripe
- On the Payment Options page, click the Connect Stripe Account button
- You will be redirected to Stripe to authorize Buzzshot to use your Stripe account
- If you do not already have a Stripe account, you can create one during this step
- After authorizing, you will be redirected back to Buzzshot
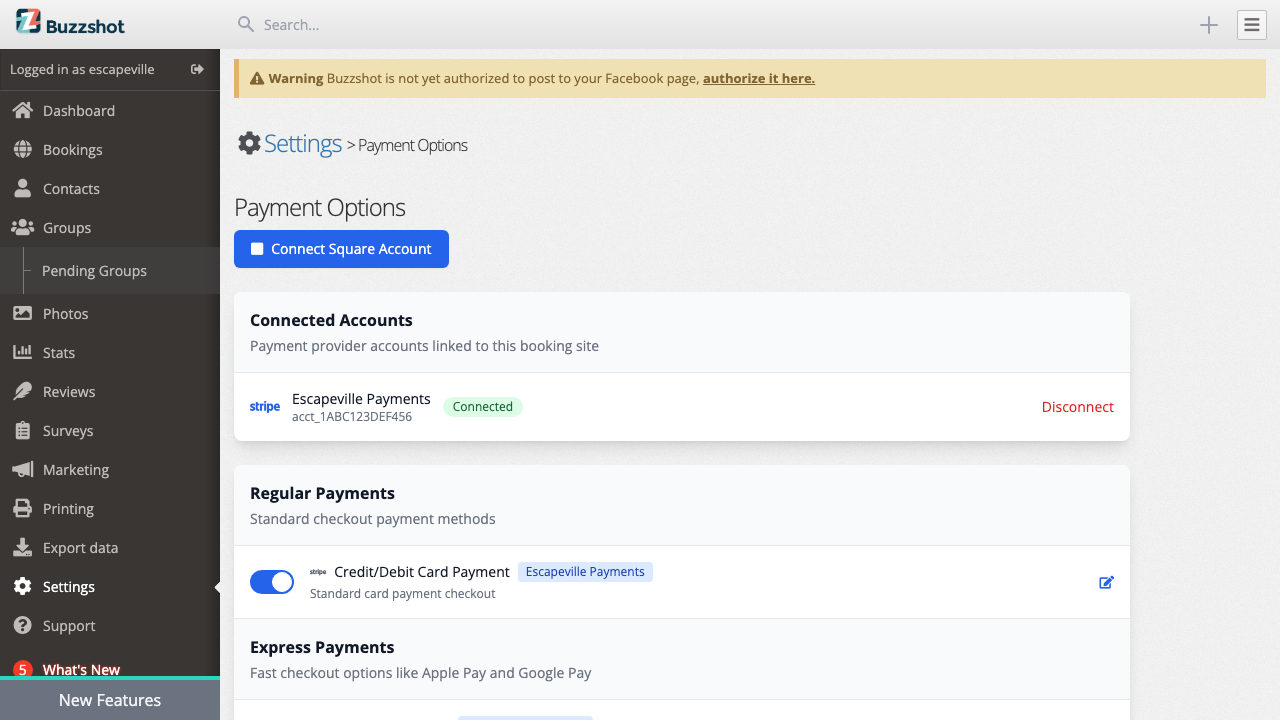
- A success message will confirm the connection, and your Stripe account will appear in the Connected Accounts section
Your Stripe account will be displayed with its name and account identifier, along with a green "Connected" badge.

Connecting Square
- On the Payment Options page, click the Connect Square Account button
- You will be redirected to Square to authorize Buzzshot
- After authorizing, you will be taken to a location selection page -- Square requires you to choose which of your Square locations to use for processing payments
- Select the appropriate location and confirm
- A success message will confirm the connection
Your Square account will appear in the Connected Accounts section with its business name.
Enabling Payment Methods
Once you have a payment provider connected, you can enable specific payment methods using the toggle switches on the Payment Options page. Each method can be turned on or off independently.

Regular Payments (Customer Checkout)
These are the payment methods your customers will see when they check out through your booking widget.
Credit/Debit Card Payment (Stripe)
This is the most common setup. When enabled, customers see a card payment form at checkout powered by Stripe. Stripe automatically shows the most relevant payment methods for your customer's region, including credit cards, debit cards, and other supported methods.
To enable:
- Make sure you have a Stripe account connected
- Find Credit/Debit Card Payment under Regular Payments
- Toggle it on
Square Payment
If you use Square as your payment processor, you can enable Square card payments for your online checkout.
To enable:
- Make sure you have a Square account connected
- Find Square Payment under Regular Payments
- Toggle it on
Tip: You can have both Stripe and Square payment options enabled at the same time. If you do, customers will be able to choose between them at checkout.
Express Payments (Apple Pay and Google Pay)
Express payments allow your customers to check out quickly using Apple Pay or Google Pay without manually entering card details. These show up as quick-pay buttons on your checkout page.
To enable:
- Make sure you have a Stripe account connected (express payments use Stripe)
- Find Express Checkout under Express Payments
- Toggle it on
Enabling Apple Pay and Google Pay in Stripe
For express payments to work, Apple Pay and Google Pay must also be enabled in your Stripe account settings. Stripe may require you to register your domain before Apple Pay will appear for your customers.
- Log in to your Stripe Dashboard
- Go to Settings > Payment methods
- Make sure Apple Pay and Google Pay are turned on
- For Apple Pay, check the Apple Pay section in your Stripe settings and verify that your booking site domain is registered -- this will be your Buzzshot subdomain (e.g. yourbusiness.buzzshot.net). Stripe will guide you through domain registration if needed.
If you have just connected Stripe, Apple Pay and Google Pay may already be enabled by default. However, it is worth checking your Stripe Dashboard to confirm, especially the domain registration for Apple Pay.
When Do Express Payment Buttons Appear?
Keep in mind that Apple Pay and Google Pay only appear for customers using supported devices and browsers:
- Apple Pay only shows up for customers using Safari on an Apple device (iPhone, iPad, or Mac) with Apple Pay set up
- Google Pay only works in supported browsers (such as Chrome) on devices with Google Pay configured
If a customer's device does not support any express payment method, the express checkout buttons simply will not appear -- it will not cause any errors or confusion.
Staff Payment Options (In-Person and Phone)
These payment methods are only available to your staff through the admin panel when managing orders. They do not appear in the customer-facing booking widget.

Manual Payment
Manual payment lets your staff record payments taken outside of Buzzshot, such as cash, checks, bank transfers, or cards processed on a separate terminal. Note that "manual payment" means recording an offline payment that has already been collected -- it does not mean manually entering a customer's card details (that is Telephone Payment / MOTO, described below).
To enable:
- Find Manual Payment under Staff Payment Options
- Toggle it on
- No payment provider account is needed for manual payments
When your staff takes a manual payment on an order, they can select the specific type (cash, check, bank transfer, card processed externally, or other). The payment is recorded as confirmed immediately.
Stripe Terminal (Card Readers)
If you have Stripe Terminal card readers at your venue, you can use them to take in-person card payments directly through Buzzshot.
To enable:
- Make sure you have a Stripe account connected
- Find Stripe Terminal under Staff Payment Options
- Toggle it on
- Set up your card reader hardware in your Stripe Dashboard if you have not already
When staff select Stripe Terminal as the payment method on an order, Buzzshot will connect to your card reader and process the payment.
Telephone Payment (MOTO)
MOTO (Mail Order/Telephone Order) allows your staff to take card payments over the phone. When processing a telephone payment, the staff member types the customer's card details directly into the Stripe Terminal hardware. This requires a Stripe Terminal card reader to be set up.
To enable:
- Make sure you have a Stripe account connected and a Stripe Terminal card reader set up
- Find Telephone Payment (MOTO) under Staff Payment Options
- Toggle it on
Editing Payment Option Names
You can customize the display name of any enabled payment method. This is the name your customers will see during checkout (for customer-facing methods) or that your staff will see when selecting a payment type.
- Find the enabled payment method you want to rename
- Click the edit icon (pencil) on the right side of the row
- In the modal that appears, change the Name field
- Click Save
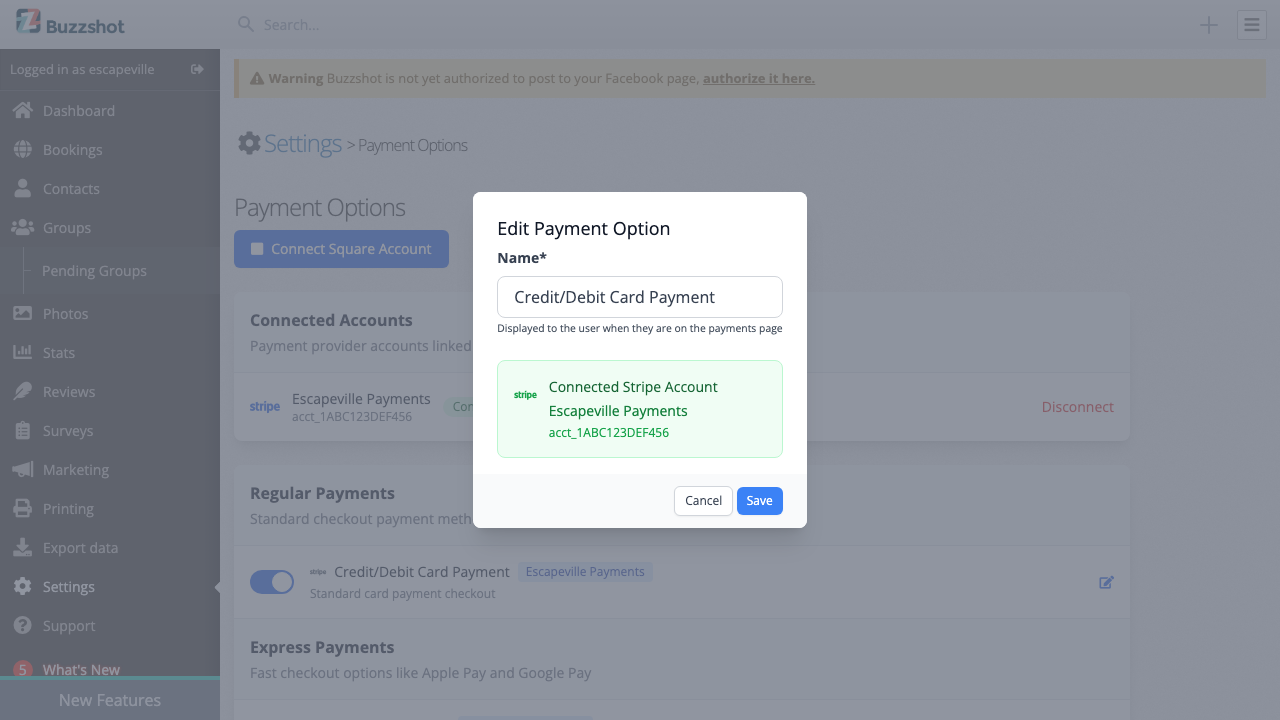
If your booking site supports multiple languages, you can provide translated names for each language.
Disabling a Payment Method
To disable a payment method, simply toggle it off. The payment method will no longer appear in checkout or be available to staff. Your existing payment records and transaction history are not affected.
You can re-enable a disabled payment method at any time by toggling it back on. Your previous settings (including any custom name) will be preserved.
Disconnecting a Provider Account
If you need to disconnect a Stripe or Square account:
- Find the account in the Connected Accounts section
- Click the Disconnect button
- Confirm the disconnection when prompted
When you disconnect a provider account, all payment methods using that account will be automatically disabled. You will see a warning message confirming how many payment methods were affected.
To reconnect later, simply click the "Connect Stripe Account" or "Connect Square Account" button again and go through the authorization flow. If you reconnect the same account, your existing payment method configurations will be preserved and can be re-enabled.
Payment Requirement Settings
If you need to adjust whether customers must pay online, you can configure the Payment setting on individual booking widgets. This is a per-widget setting found in Settings > Booking Widget > Details tab > Checkout section. Options include:
- Require payment (default) -- Customers must pay online before their booking is confirmed.
- Optional payment -- Customers choose between "Pay Now" or "Pay Later" at checkout. Those who select "Pay Later" complete their booking without payment.
- No payment -- Customers skip the payment step entirely. Bookings are confirmed immediately without any payment.
You can configure different payment settings for different widgets if needed. See Booking Widget Configuration for details.
Tips and Troubleshooting
A payment method is not showing up in customer checkout: - Check that the payment option is toggled on in Settings > Payment Options - Make sure the associated provider account shows as Connected
An order shows "Stripe Link Payment" as the payment method: This refers to Link by Stripe -- a one-click checkout feature where customers save their card details for faster payments across websites. It is not the same as Payment Links (which are payment URLs you send to customers). This is normal behaviour when a customer pays using their saved Link details.
Express payments (Apple Pay / Google Pay) are not appearing: - Check that Express Checkout is toggled on in Settings > Payment Options - Make sure Apple Pay and Google Pay are enabled in your Stripe Dashboard under Settings > Payment methods - For Apple Pay, check that your Buzzshot subdomain (e.g. yourbusiness.buzzshot.net) is registered in your Stripe Apple Pay settings - Apple Pay only works in Safari on Apple devices with Apple Pay configured - Google Pay only works in supported browsers on devices with Google Pay set up
Can I use multiple payment providers at the same time? Yes. You can have both Stripe and Square enabled simultaneously, and customers will be able to choose between them at checkout.