Schedules & Availability
Schedules control when your customers can book your rooms. Each bookable item has its own independent set of schedules, so you can run different hours for different rooms. Buzzshot Bookings gives you a flexible scheduling system that lets you set up regular weekly hours, create seasonal schedules, and fine-tune individual time slots as needed.
This article covers how to set up and manage your schedules, configure availability, and use rules and overrides to handle special situations.
Setting Up Your Bookable
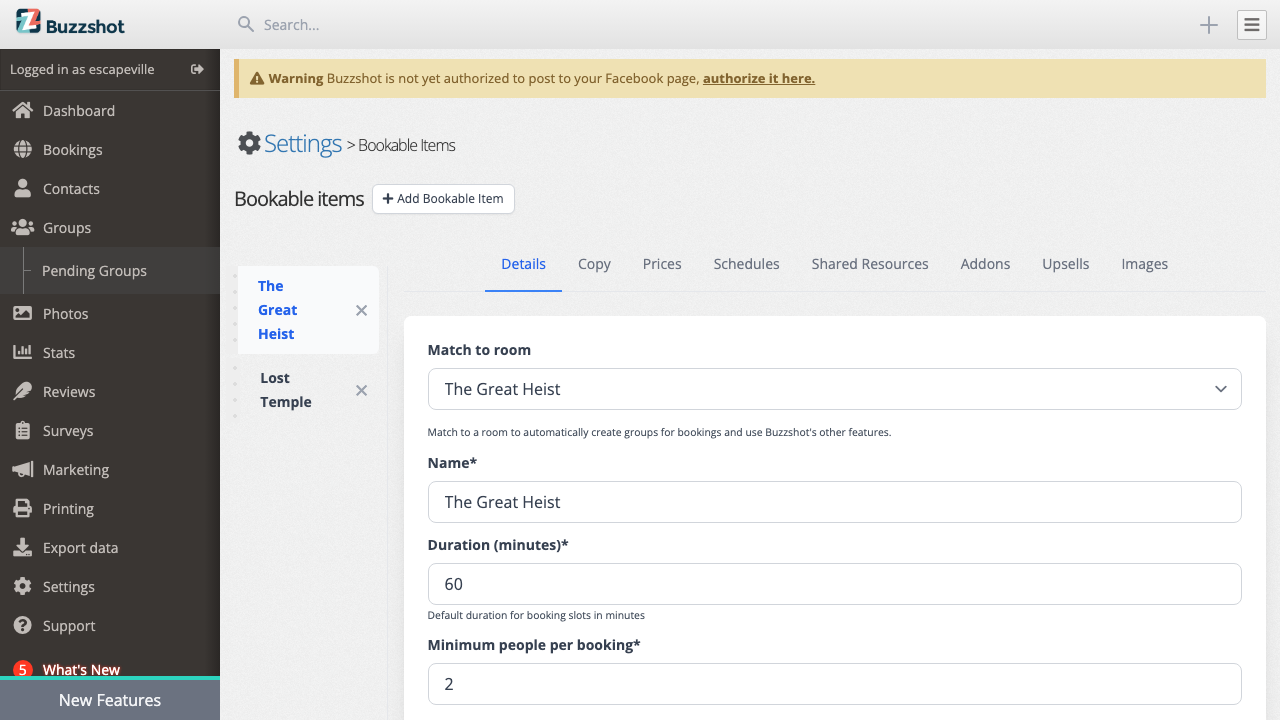
Before configuring schedules you'll want to make sure your bookable's basic settings are correct. You can find these in Settings > Bookable items and then selecting your bookable item.
On the Details tab you'll find these scheduling-related settings:
-
Duration (minutes) -- The default length of each booking slot. For example if your escape room session lasts 60 minutes, set this to 60. All slots will use this duration unless individually overridden.
-
Minimum people per booking -- The fewest number of people a customer can book for. For example set this to 2 if you don't allow solo bookings.
-
Maximum people per booking -- The most people allowed in a single booking. If you don't set this it defaults to the "Maximum people per slot" value.
-
Maximum people per slot -- The absolute maximum number of people that can be booked into a single time slot across all bookings. For private escape rooms this is usually the same as your maximum group size.
-
Maximum bookings per slot -- How many separate bookings can be made for the same time slot. Set this to 1 for private bookings (one group per session). Set it higher if you run public sessions where multiple groups play together.
-
Reset Time (minutes) -- How long after a booking ends before the next booking can start. This is your buffer time for cleaning, resetting puzzles, or briefing the next group. For example if you need 15 minutes to reset your room between groups, set this to 15.
-
Booking mode -- The default mode for all slots of this bookable:
- Instant bookings -- Customers can book and pay immediately online (the default).
- Call to Book -- Slots are shown but customers are asked to call you to book. Useful for slots you want to offer but manage manually.
- Request to Book -- Customers submit a booking request that you then confirm or reject from the admin area.
-
Hidden -- Toggle this on to hide the bookable from your booking widget and calendar entirely. The bookable will still be visible in your admin settings so you can manage it, but customers won't see it and it won't appear on your calendar.
Understanding Schedules
A schedule defines a weekly pattern of available time slots. Think of it as a template that says "every Monday offer slots at 10am, 11am, 12pm..." and so on for each day of the week.
Every bookable starts with a Default Schedule. The default schedule has no date range and is always active as a baseline. You can then create additional schedules with specific date ranges that override the default when active.
Only one schedule is active per day. When you have multiple schedules, the system picks the highest-priority one whose date range covers that day. The default schedule has the lowest priority (0), so any schedule with a date range will take precedence when its dates apply.
Creating and Editing Schedules
To set up your schedule:
- Go to Settings > Bookable items and select your bookable.
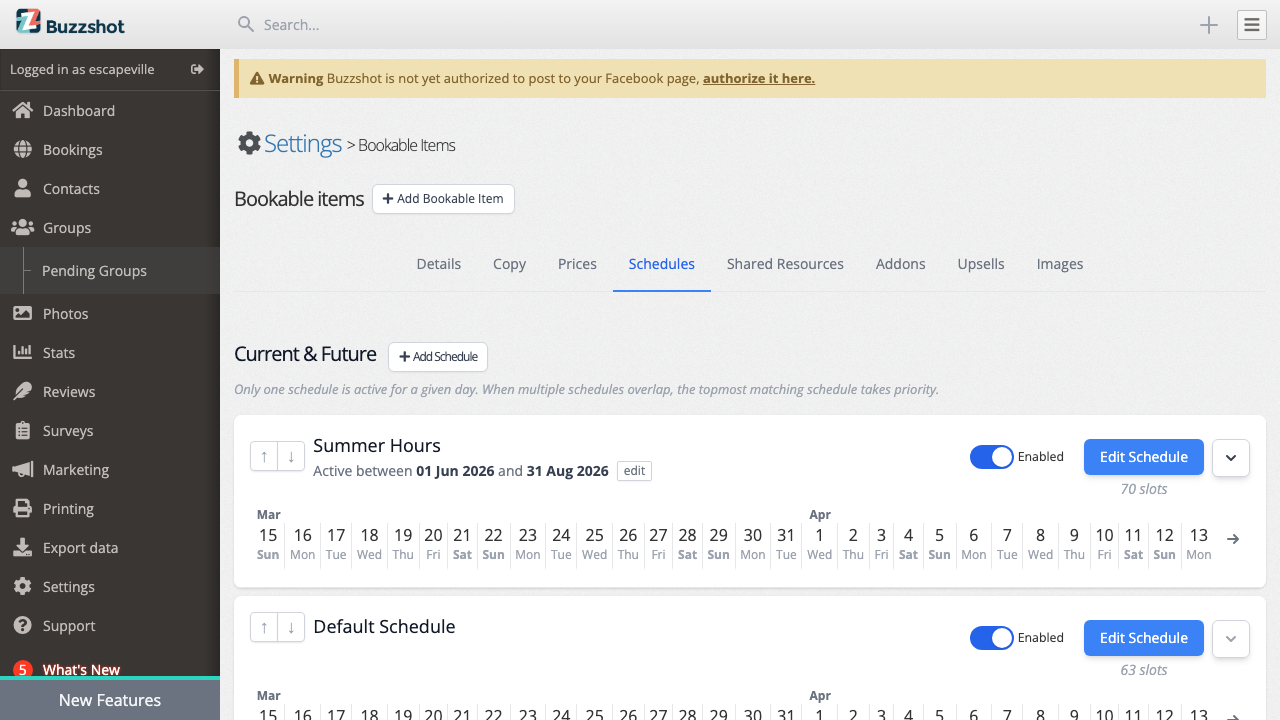
- Click the Schedules tab.
- You'll see your default schedule. Click on it to expand the weekly editor.
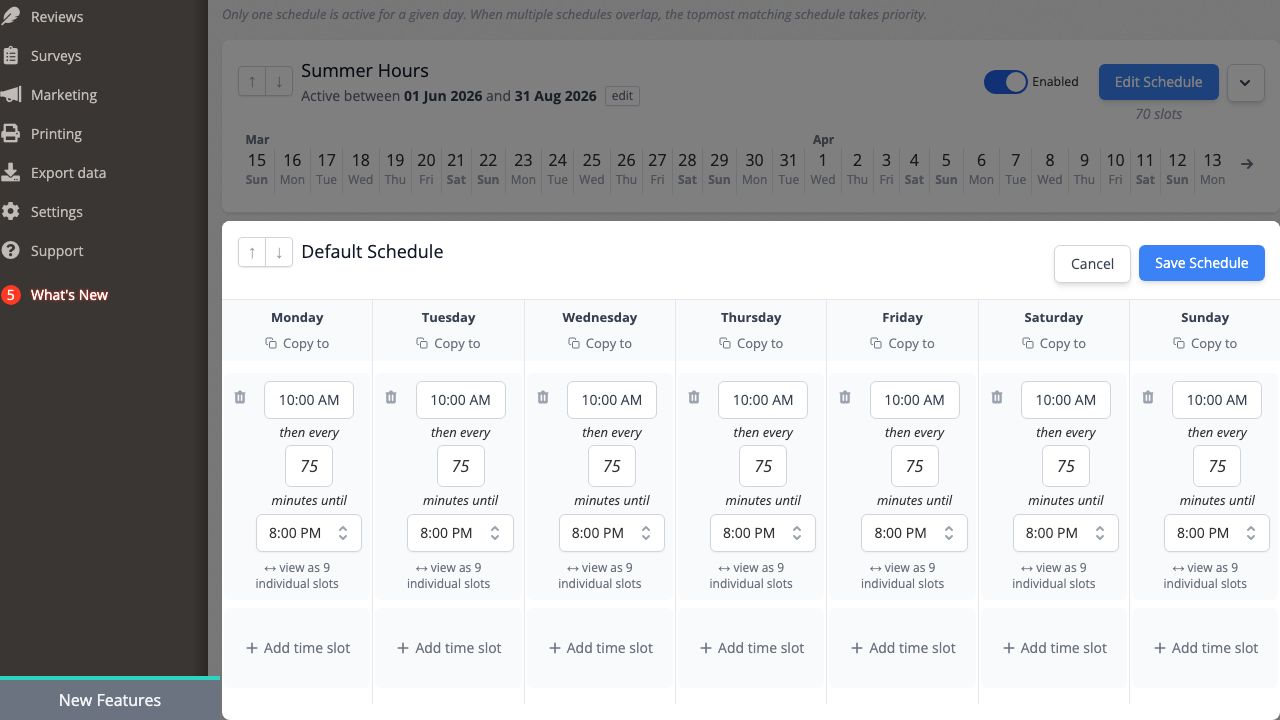
The schedule editor shows a grid with a column for each day of the week (Monday through Sunday). Each column shows the time slots configured for that day.
Adding time slots:
- Click Add time slot at the bottom of a day's column to add a new slot. It will automatically suggest a start time based on your existing slots.
- Edit the start time directly in the input field.
- To quickly fill a day, click Repeat on a slot to turn it into a repeating range -- set the interval (e.g. every 75 minutes) and end time, and the editor will generate all the slots for you.
- Use Copy to on a day's header to copy that day's slots to other days of the week.
Removing time slots:
- Click the delete icon next to a slot to remove it.
Saving:
Once you've finished editing, you must click Save to apply your changes. Changes are not saved automatically.
It's perfectly fine to add time slots for times that aren't always used. Having a slot in the schedule doesn't mean you'll get a booking for it -- it just means it's available. You can always block specific slots later.
Using Multiple Schedules
Multiple schedules let you handle seasonal changes, special event periods, or any situation where your regular hours need to change temporarily.
Creating a new schedule:
- On the Schedules tab, click the button to create a new schedule.
- Give it a descriptive name (e.g. "Summer Hours", "Holiday Season").
- Set the start date (when this schedule should begin taking effect).
- Optionally set an end date. If you leave this blank the schedule will continue indefinitely from the start date.
- Click save, then expand the new schedule to add its time slots.

How priorities work:
- The default schedule always has the lowest priority.
- New schedules are created with a higher priority than existing ones.
- You can reorder schedules using the priority arrows to control which one takes precedence.
- When multiple schedules could apply to the same day, only the highest-priority one is used. The lower-priority schedule's slots are completely replaced, not merged.
The 30-day preview:
Below each schedule you'll see a strip of dates showing the next 30 days. Days where the schedule is actively in use are highlighted. This makes it easy to verify that your schedules are set up correctly and that the right one is active on the right days.
Enabling and disabling:
You can enable or disable a schedule without deleting it. A disabled schedule has no effect regardless of its date range or priority. This is useful for preparing a schedule in advance and turning it on when you're ready.
Example: Summer extended hours
Suppose you normally run sessions from 10:00 to 20:00 but want to add evening sessions during summer:
- Keep your default schedule with 10:00-20:00 slots.
- Create a "Summer Hours" schedule starting 1st June and ending 31st August.
- In the summer schedule, add all the same slots as the default PLUS the extra evening slots (20:00, 21:00, etc.).
- Since the summer schedule has higher priority, it will completely replace the default schedule during those months.
Remember that the active schedule replaces the default entirely for that day -- it does not add to it. So make sure your seasonal schedule includes ALL the slots you want, not just the extra ones.
Per-Slot Overrides
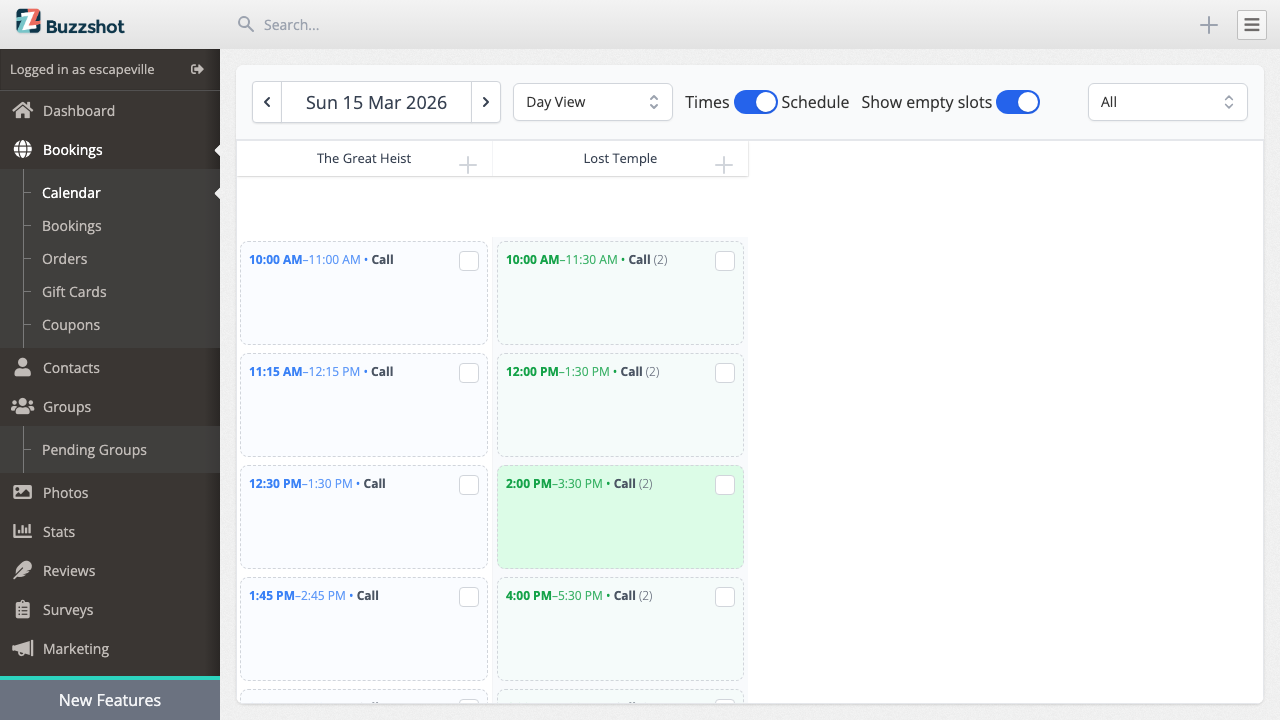
Sometimes you need to adjust a specific time slot on a specific date without changing your entire schedule. You can do this from the calendar view.
Go to Bookings > Calendar to see your slots laid out in a day or week view. Click on any slot to open the sidebar, then click Edit to open the edit modal where you can override:
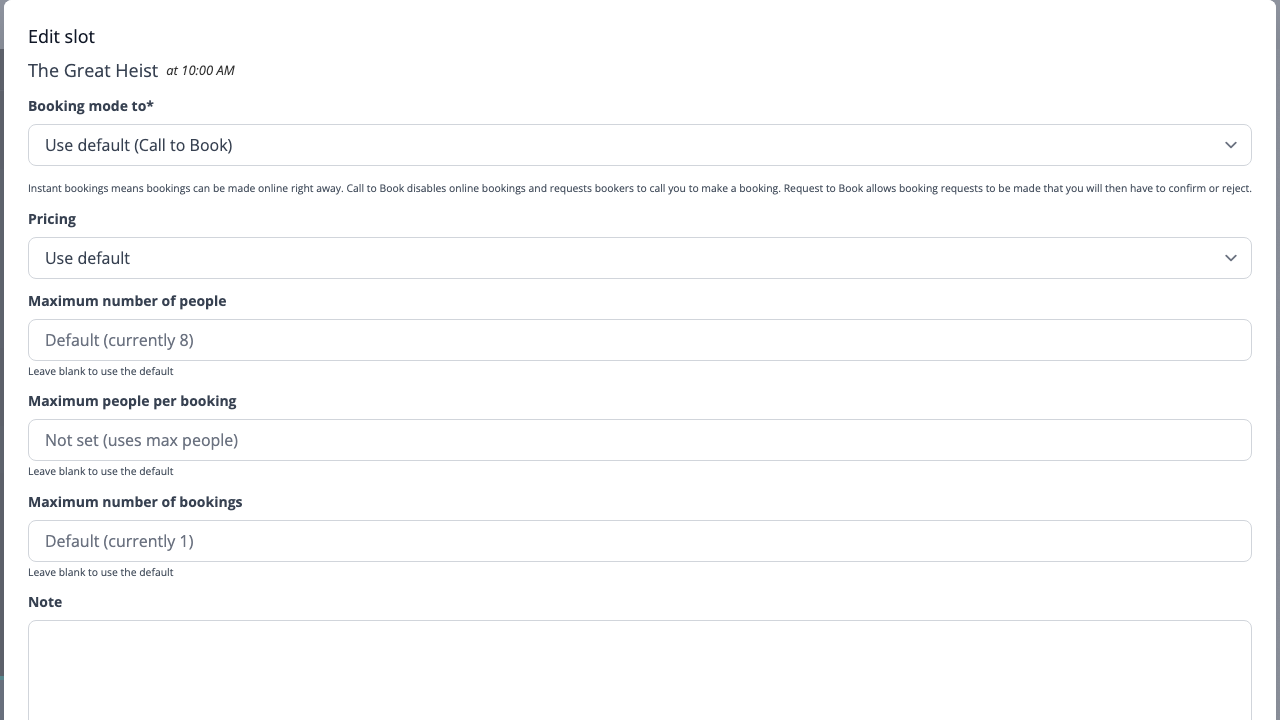
-
Booking mode -- Change to instant, call to book, request to book, or blocked for just this one slot. The dropdown shows "Use default" with the current effective mode in brackets so you always know what will apply if you don't override it.
-
Maximum people -- Override the maximum number of people for this slot. Leave blank to use the default. The placeholder shows the current default value.
-
Maximum people per booking -- Override the per-booking people limit.
-
Maximum bookings -- Override how many bookings can be made for this slot.
-
Pricing -- Choose a different price group for this slot.
-
Note -- Add an internal note about this slot (not visible to customers). Useful for noting why a slot is blocked or has special settings.
Per-slot overrides have the highest priority in the system. They override both the bookable defaults and any rules that apply.
Important: If a slot has been individually set to a specific booking mode (like "Instant Booking") instead of "Use default", it will bypass all your rules for that slot. If a rule doesn't seem to be working on a particular slot, check its per-slot override first.
Creating one-off slots:
You can also create slots that aren't part of any schedule. Click the create button in the calendar view, choose a bookable, set a date, time, and duration. This is useful for adding a single extra session on a particular day.
Note: New slots created in the calendar default to "Instant Booking" mode rather than "Use default". If you have rules you want to apply to these slots, remember to set the booking mode to "Use default" after creating them.

Bulk editing:
If you need to change multiple slots at once (for example blocking all slots on a particular day), you can select multiple slots and edit them in bulk. When bulk editing, you choose which fields to update and those changes apply to all selected slots.
Rules
Rules let you automatically apply changes to slots based on conditions. Instead of manually adjusting individual slots, you define a rule once and it takes effect across your entire schedule. For example:
- Automatically switch last-minute slots to Request to Book so you can review bookings close to the session time.
- Apply peak pricing on weekends or evenings without touching each slot.
- Block all slots during a closure period like a renovation or holiday.
- Show a "Last Few!" label on slots that are almost full to create urgency.
Rules can match on time of day, day of week, how far in the future a slot is, date ranges, and even weather conditions. You can combine multiple conditions and chain rules together for precise control.
Rules are found in Settings > Rules. For full details on setting up conditions, actions, and examples, see the Rules article.
How Availability is Calculated
Understanding how Buzzshot calculates availability helps you set up your schedules correctly.
A time slot is available when all of the following are true: - It is not blocked - It is not in the past - There is remaining capacity (not fully booked)
Capacity is determined by your settings: - Maximum bookings per slot limits how many separate bookings can be made. - Maximum people per slot limits the total number of people across all bookings.
When a customer makes a booking, it uses up capacity from both limits. For example if your room has a max of 10 people and max of 2 bookings, and someone books for 6 people, you'd have 1 booking slot and 4 people remaining.
Reset time creates a gap between consecutive bookings. If you have a 15-minute reset time and a booking runs from 14:00 to 15:00, the room is considered occupied until 15:15. No new booking can start during that buffer period, even if the next slot technically starts at 15:00. This means you need to account for reset time when spacing your slots.
Shared resources can further limit availability. If two of your rooms share a waiting area that only fits one group at a time, booking one room's slot will reduce availability for the other room during that same period. See the Shared Resources documentation for more details.
Override priority:
When determining the final settings for any given slot, the system applies overrides in this order (highest priority last):
- Bookable defaults (from the Details tab)
- Schedule-level settings (e.g. a call-to-book flag on certain recurring slots)
- Rules (evaluated in order, each can modify previous settings)
- Per-slot overrides (set on specific date/time slots in the calendar view -- highest priority)
This means a per-slot override will always win over a rule, and a rule will override the bookable defaults.
Booking Modes in Detail
Buzzshot supports several ways to control how customers interact with your time slots:
Instant Booking is the default mode. Customers select a time slot, choose their tickets, pay online, and receive an immediate confirmation. This is the most common setup for escape rooms.
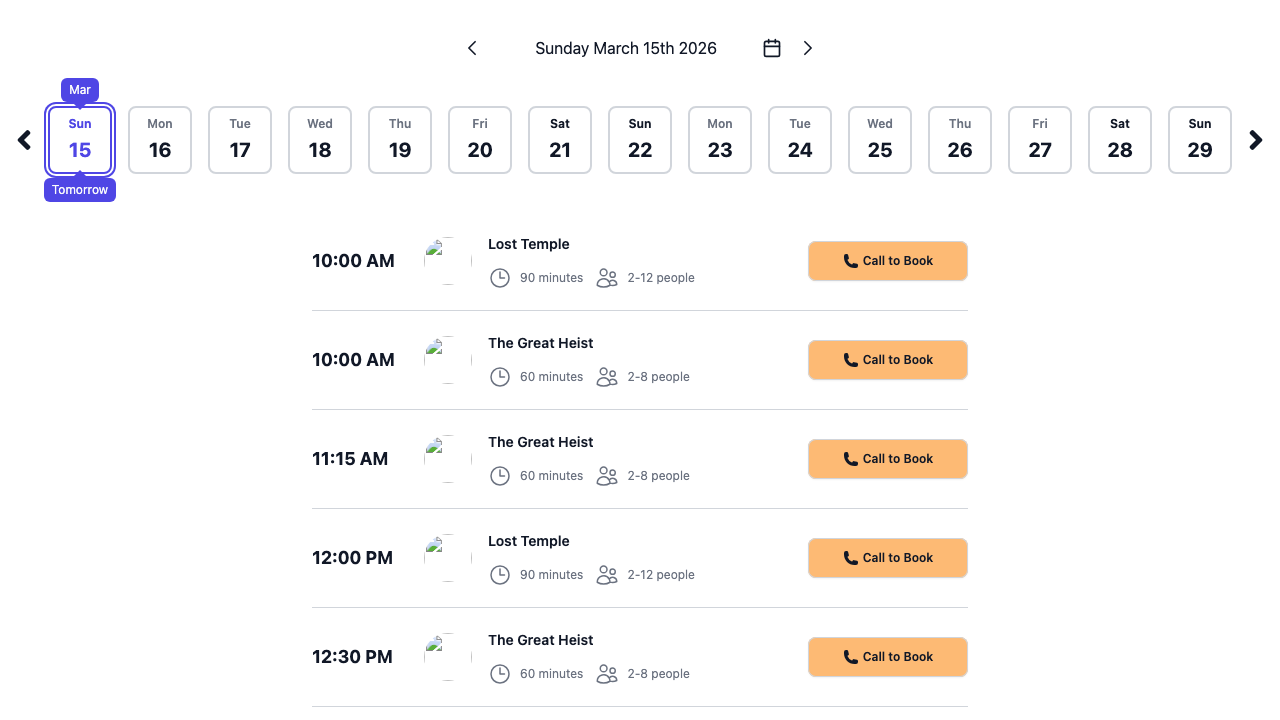
Call to Book shows the time slot to customers but doesn't allow online booking. Instead, the customer sees a prompt to contact you directly. Use this for: - Slots you want to fill manually (e.g. large corporate bookings) - Last-minute availability where you want to speak with the customer first - Times when you're not sure if you'll be open
Request to Book (also called a Booking Request) allows customers to submit a booking request online, but the booking isn't confirmed until you review and approve it from your admin area. When a customer submits a request, a hold is placed on their payment card. If you approve the request the payment is captured; if you decline it the hold is released. Use this for: - High-value bookings where you want to screen customers - Times where you need to check staff availability before confirming - Special events or unusual group sizes
Blocked makes the slot completely unavailable. Customers won't be able to interact with it. Use this for: - Maintenance periods - Days you're closed - Slots reserved for private events
You can set the booking mode at multiple levels: - On the bookable itself (affects all slots as a default) - On individual slots in the calendar view (overrides for specific dates/times) - Via rules (automatically applied based on conditions)
Tips and Common Scenarios
Private escape room bookings: Set "Maximum bookings per slot" to 1. This ensures each time slot can only have one booking, giving each group a private session.
Blocking a day for maintenance: Open the calendar view, select all slots on that day, and bulk-edit them to "Blocked". Or create a rule with a date condition.
Closing for a period (renovation, holiday, etc.): Create a rule with a Date condition covering the closure period, set the action to Blocked, check "Stop", and place it at the top of your rules list. This is more reliable than disabling a schedule or using a schedule's end date -- schedule dates control when the schedule's time slots are offered, not when your venue is open. Existing confirmed bookings are not affected by rules, so you'll need to handle those separately.
Seasonal changes: Create a new schedule with a date range covering the season. Remember to include ALL slots you want during that period, not just the extras, because the seasonal schedule completely replaces the default.
Gradual roll-out of new hours: Create your new schedule but leave it disabled. Set up all the slots, then enable it when you're ready to go live.
Spacing slots with reset time: If your room takes 60 minutes and you need 15 minutes to reset, set the duration to 60 minutes and the reset time to 15 minutes. Then space your slots 75 minutes apart (e.g. 10:00, 11:15, 12:30). The reset time ensures that even if you place slots closer together, the system will prevent double-bookings during the buffer.
Offering different prices at different times: First create price groups in Settings > Price Groups for your different pricing tiers (e.g. "Peak" and "Off-Peak") and set the prices for each tier. Then use rules with time-of-day or day-of-week conditions to apply the right pricing automatically.
Troubleshooting
A rule isn't working on certain slots: Check the calendar view and click on the affected slot. If the booking mode or pricing is set to a specific value instead of "Use default", the per-slot override is taking priority over your rule. Set it back to "Use default" to let rules apply normally.
A slot shows as unavailable when it shouldn't: Check for overlapping bookings, shared resource constraints, and reset time buffers from adjacent bookings. The slot may also be set to "Blocked" by a per-slot override or a rule.
Changes to schedules aren't appearing: Make sure you clicked Save after editing. Also check whether another schedule with higher priority is active on that day -- use the 30-day preview strip to verify which schedule is in effect.
Will changing my schedule affect existing bookings? No. Editing, replacing, or disabling a schedule only affects future availability. Existing confirmed bookings remain untouched.