Conditional email content: show different content per room
Every piece of content in the email editor can be given a Condition. A condition means the content only appears when something you specify is true, and is left out the rest of the time. This lets a single email show different content to different people automatically.
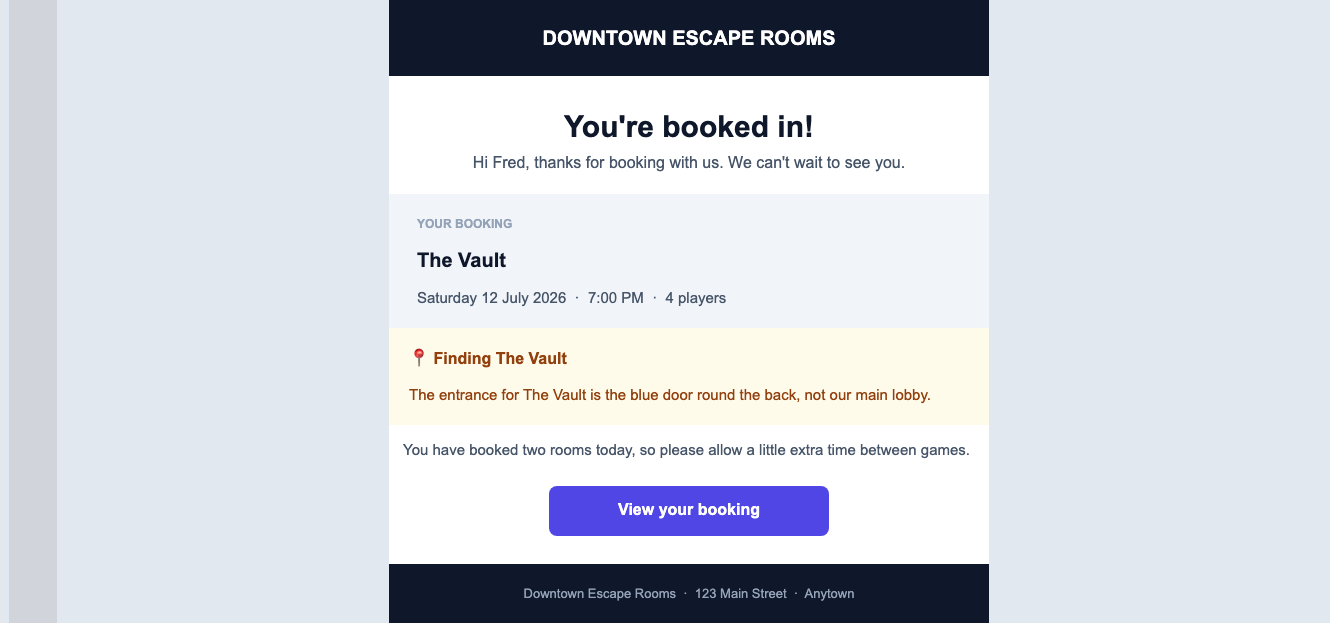
A good example is your order confirmation email. A single order (one customer's whole purchase) can include more than one room, so a condition lets you add a separate set of instructions for each room, and each customer only sees the instructions for the rooms they actually booked. The email below is one design; the highlighted note about The Vault is set to appear only for customers whose order includes The Vault.
Conditions are not just for order confirmations. They work in any email you build in the editor, including your after-game "Thanks for playing" email, reminders, marketing emails, and the email steps inside your Automations. Which conditions you can use changes from email to email, which we cover in What conditions you can use below.
First, how an email is built
The email editor lays out your email as a stack of rows, one above the next. Each row is split into one or more columns side by side, and into those columns you drop content blocks. A content block is a single piece of the email: a chunk of text, an image, a button, a divider, and so on. You add them by dragging from the palette down the left-hand side.
The only part you need to think about for conditions is the content block, because a condition is attached to a single block. Hide a block with a condition and just that block disappears; everything else in the email stays put.
If the editor itself is new to you, the Email editor article gives you the full tour first.
Where to find the Condition setting
The Condition setting sits in every content block's settings, the same way in every email:
- Open the email you want to edit. Your standard emails are listed under Settings > Emails, and the email steps inside your Automations have the same editor.
- Click the block you want to show or hide (for example a block of text). Its settings open on the right.
- Scroll the settings down to the Condition section at the bottom.
By default a block has no condition, so it always shows. Adding a condition tells the editor to only include that block when the condition is met.
A worked example: per-room arrival instructions
This is one of the most useful things conditions can do. Say you have a room called The Vault whose entrance is hard to find, and you only want customers who booked The Vault to get the directions.
- In the Confirmed Order email, drag in a Text block where you want the instructions to appear, and write the directions for The Vault.
- Click that block to select it, and scroll its settings down to the Condition section.
- In the first dropdown, choose Order Bookable Item.
- In the second dropdown, choose contains.
- In the third dropdown, choose The Vault.
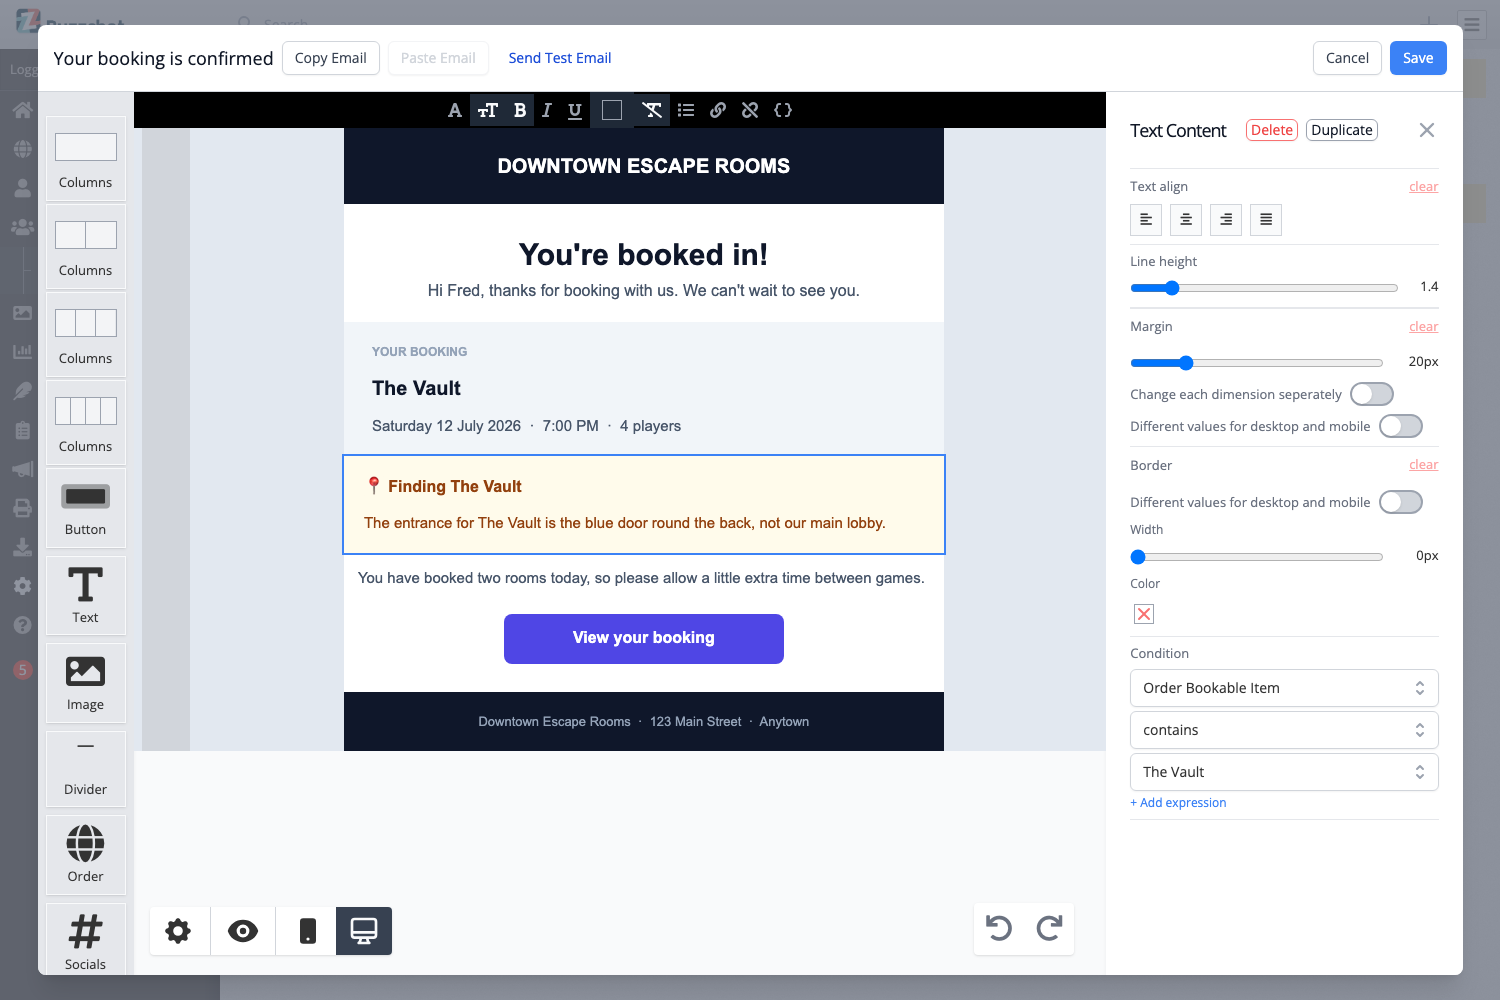
That is it. The block now reads "Order Bookable Item contains The Vault", so it only appears for customers whose order includes The Vault. Customers who booked a different room never see it.
To cover all your rooms, repeat this for each one: add a Text block with that room's instructions and give it a condition for that room. A customer who books two rooms in one go simply sees both blocks.
Building a condition
A condition is built from three parts, shown as three dropdowns stacked on top of each other:
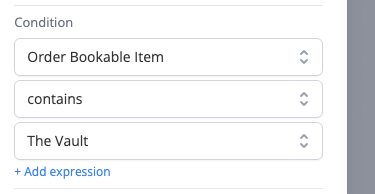
- The detail to look at (top dropdown): the piece of information you want to check, such as Order Bookable Item, Room Name, or a player's detail.
- The rule (middle dropdown): how to test it, such as contains, is equal to, or is present.
- The value (bottom dropdown or box): what to compare against, such as a specific room. When the detail has a fixed set of options (like your rooms), you pick from a dropdown. Otherwise you type the value into a box.
The rules you can choose from depend on the kind of detail you picked:
| Kind of detail | Rules available |
|---|---|
| A list, like Order Bookable Item | contains, does not contain |
| Text, like Room Name or a player's name | is present, is not present, is equal to, is not equal to, contains, does not contain |
| A yes/no detail, like whether the team won | is true, is false |
is present is true whenever the detail has any value at all (for example, a game master was recorded), and is not present is true when it is empty. These two rules do not need a value, so the bottom dropdown disappears.
Showing alternative content ("if not this, then that")
There is no single "otherwise" setting, but you get the same result with a second block and the opposite rule.
For example, to show one welcome message to customers who booked The Vault and a different one to everyone else:
- Block A: your Vault message, with the condition Order Bookable Item contains The Vault.
- Block B: your standard message, with the condition Order Bookable Item does not contain The Vault.
Each customer sees exactly one of the two.
Combining several conditions
You can test more than one thing at once. Once you have set a single condition, a + Add expression link appears underneath it. Click it to add another test. A Match option then appears at the top of the group:
- Match ALL of means every test must be true (an "and").
- Match ANY of means at least one test must be true (an "or").
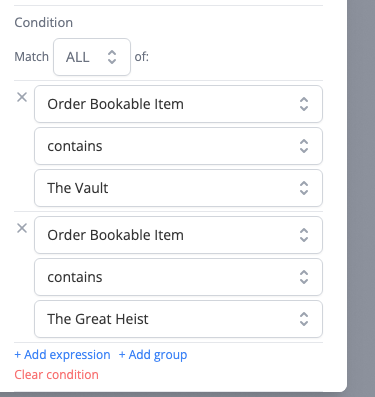
For more involved logic you can also click + Add group to nest a second set of tests inside the first, so you can mix ALL and ANY together. Most emails never need this, but it is there when you do.
To remove a condition entirely and go back to always showing the block, click Clear condition.
What conditions you can use
The options in that first dropdown are not the same in every email, because each email knows about different things:
- Order emails (the order confirmation, cancellations and changes) know about the whole order, which can contain several rooms. That is why they offer Order Bookable Item, a list of every room in the order, so you can test whether a particular room is included.
- After-game emails like Thanks for playing are about a single game, so instead of a list they know the one Room that was played. In those emails, test against Room or Room Name, for example Room is equal to The Vault.
- Depending on the email, you may also be able to test other details such as the player's name, their tags, or whether the team won.
If you do not see the detail you were expecting in the dropdown, that email most likely does not have that information to hand. If you are not sure what you can use in a particular email, just ask us.
A note for advanced users
If you choose Custom expression (ADVANCED) in the first dropdown, you can type a condition by hand using the same template language used elsewhere in Buzzshot. This is only for unusual cases the dropdowns cannot express. That written language, including how to write these conditions by hand, is covered in Email/SMS Template Variables.
Tips
- A block with a condition still looks completely normal while you are editing, so you can always see it and change it. The condition only takes effect when the email is actually sent.
- Send yourself a test of the email after adding conditions, against a real booking, so you can check the right content shows up. The Preview button shows the email with sample details, but a real test send is the surest check.
- Keep your conditions simple where you can. One block per room, each with a single condition, is easy to follow and easy to change later.
If you would like a hand setting up conditions for your rooms, just get in touch and tell us what you are trying to do. We are happy to help.