Using the Bookings Calendar
The bookings calendar is where you'll spend most of your time in Buzzshot Bookings. It gives you a visual overview of all your time slots and bookings across your rooms, letting you see at a glance who's booked in, which slots are available, and what's coming up.
You'll find the calendar at Bookings > Calendar.
Navigating the Calendar
The calendar has a control bar at the top with several options for customising your view.

Date navigation: Use the left and right arrows to step through days (or weeks, in week view). Click the date in the centre to open a date picker where you can jump to any specific date.
Day / Week view: Switch between viewing a single day or a full week using the view selector dropdown.
Times / Schedule toggle: In day view, you can switch between two display modes: - Times shows a full time grid where slots are positioned at their actual times, like a traditional calendar. This is the best view for seeing gaps and overlaps at a glance. - Schedule shows a compact vertical list of slots without the time grid. This takes up less space when you have only a few slots per day.
Show empty slots: Toggle this to show or hide slots that have no bookings. Hiding empty slots helps you focus on booked sessions during busy periods.
Room filter: If you have multiple bookable items, use the room filter to show only specific rooms. This is useful when you want to focus on a particular room without the distraction of others.
Zoom: In the bottom-right corner, use the + and − buttons to zoom in or out on the calendar. This is helpful if you have many rooms or closely-spaced slots.
Understanding What You See
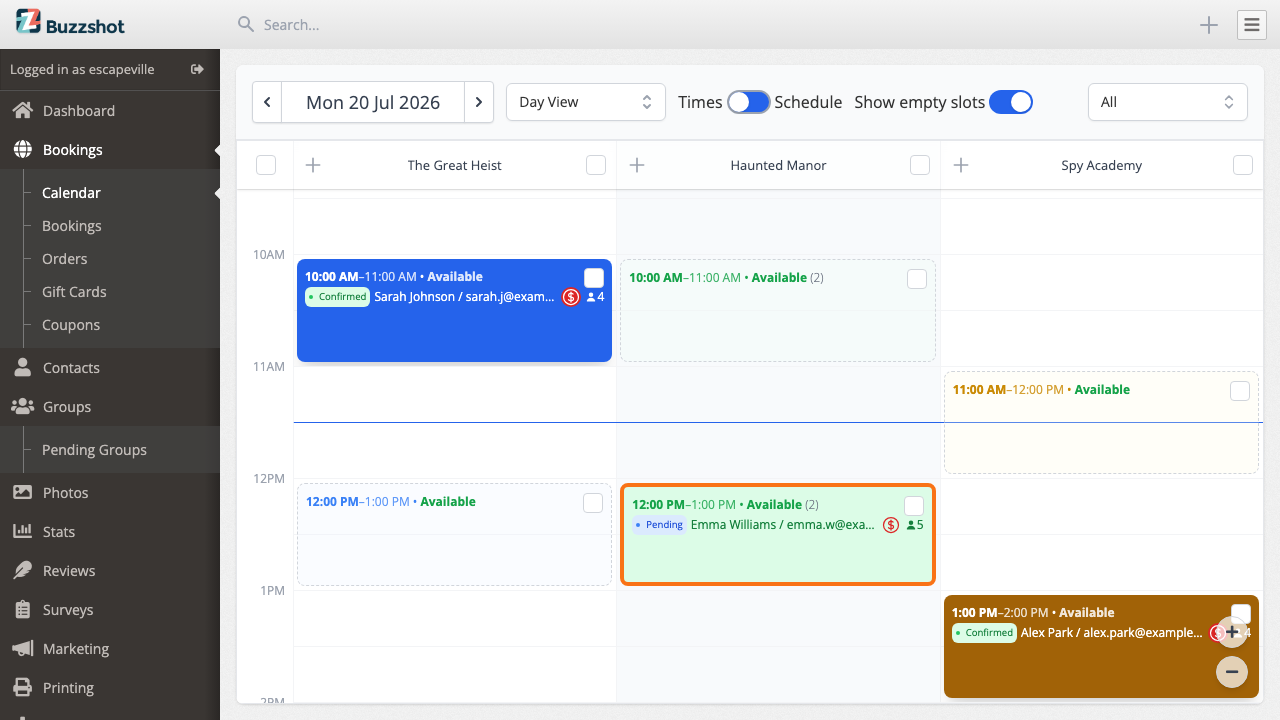
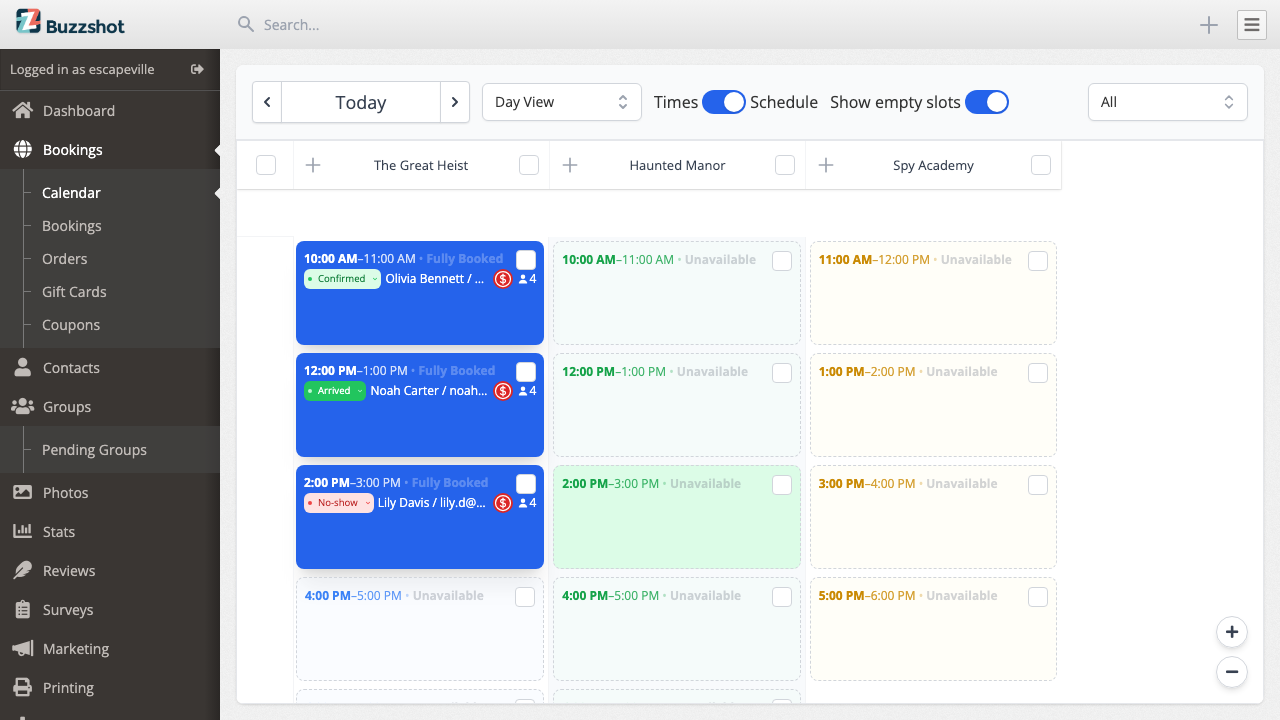
Each time slot on the calendar shows key information at a glance.
Day View
In day view, each room gets its own column. Slots are positioned vertically according to their time, and when you're viewing today, a blue line marks the current time.
If a room has a reset time, each booked slot has a hatched band underneath it for that time. Nothing else can start in the room until the band ends.
Shared Resource Columns
A shared resource can have its own column in day view too, after your rooms. It shows the bookings that hold the resource, over grey bands for its capacity through the day, and you can change that capacity for a single date from there: for example, when one game master is off sick. Turn it on with Show in bookings calendar on the resource's Details tab. See Capacity Schedules for how it works.
Week View
In week view, each day gets its own column. Slots for all your rooms are stacked within each day.
What Slots Show
Each slot on the calendar displays:
- Customer name and email for each booking in the slot
- Status badge (Confirmed, Pending, Arrived, or No-show) next to each booking — see Marking Bookings as Arrived or No-show for details
- People count for each booking
- Time range (start and end time)
- Availability status: Available (green), Call (grey), Request (yellow), Blocked (red), In Cart, or Fully Booked — shown in white on solid confirmed slots
- Payment outstanding icon (a red currency symbol) if a booking has unpaid balance — hover over it for a breakdown
- Pinned notes from individual bookings
- Slot note if one has been set (shown in italics at the bottom)
Slot Colours
Each room has its own colour on the calendar — you can choose it with the Calendar color option on the bookable item's Details tab. How strongly a slot is coloured gives you a quick visual summary:
- Solid colour — the slot has at least one confirmed booking. Confirmed sessions stand out as solid blocks of the room's colour so you can see your locked-in business at a glance.
- Pale with an orange border — the slot has pending bookings (e.g. request-to-book awaiting your approval)
- Pale with a red border — the slot is blocked
- Pale with a dashed grey border — the slot is empty and available
Viewing Slot Details
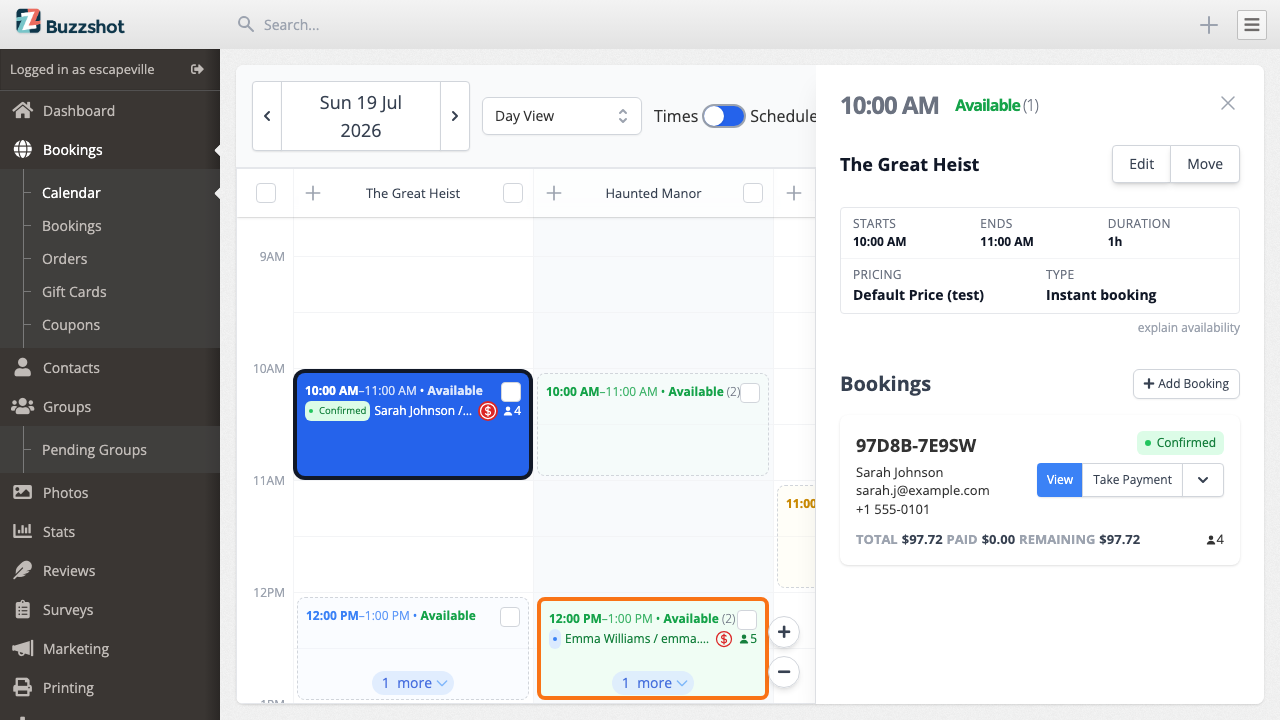
Click on any slot to open the detail panel on the right side of the screen. The panel shows comprehensive information about that slot.
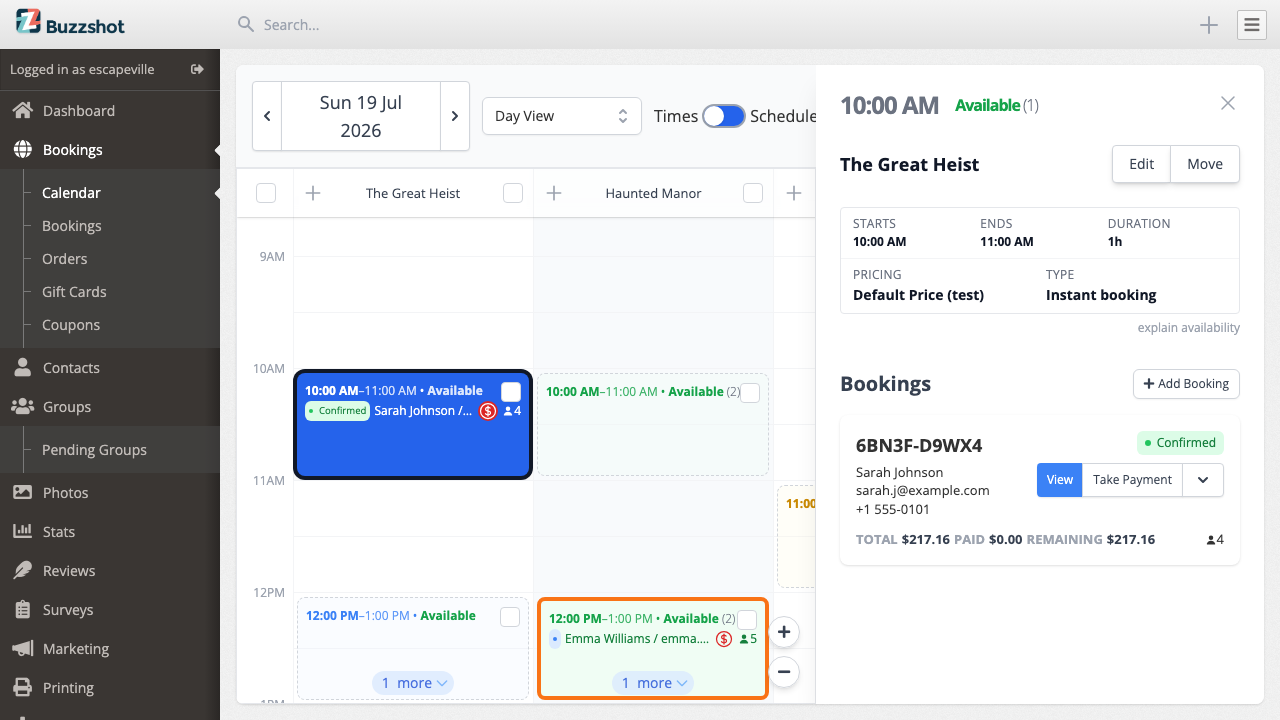
Slot information:
- Start time, end time, and duration
- Current pricing group
- Booking type (Instant booking, Call to book, Request to book, or Blocked)
- Capacity overrides (max people, max bookings) if they've been set on this specific slot
- Slot note (if set)
Bookings: Each booking in the slot is shown as a card with:
- Order reference number (click to open the full order)
- Customer name, email, and phone
- Payment summary (total, paid, remaining)
- People count
- Pinned note
- Order status and action button
If the slot has no bookings, you'll see a "No Bookings Yet" message with an Add Booking button.
Carts in progress: If a customer is currently in the process of booking this slot (they've added it to their cart but haven't completed checkout), you'll see a Carts in progress section. This shows the customer's contact details (if available) and a countdown timer showing when their cart will expire. You can click Expire Now to manually release the slot if needed.
Rules applied: If any rules are affecting this slot, they're listed at the bottom of the panel so you can see exactly what's been applied.
Marking Bookings as Arrived or No-show
Once a booking is confirmed, you can mark whether the customers actually showed up. Every confirmed booking has a status — Confirmed, Arrived, or No-show — shown as a coloured pill next to the customer's name on the calendar, in the slot detail panel, and on the order page. Light green is Confirmed, bright green is Arrived, red is No-show.
Click the pill and pick the status you want — it updates immediately.
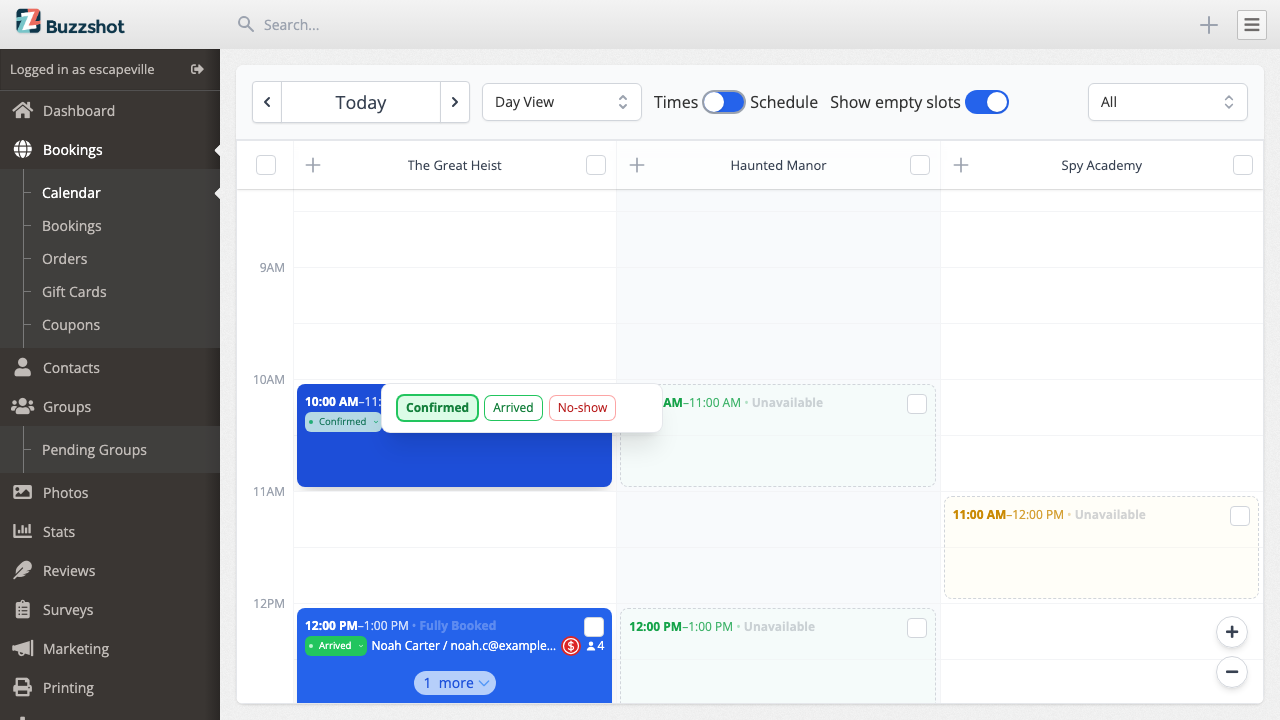
The pill only becomes clickable once the booking is today or in the past — future bookings show the pill but you can't change it yet. Arrival status only applies to confirmed orders; pending, cart, and cancelled orders show their order status instead. If a single order has bookings across two or more time slots, the order header pill lets you mark each booking separately, or use Set all bookings to mark them all at once (only once they're all in the past).
Editing Slots
From the detail panel, click Edit to open the edit modal where you can override settings for this specific slot.
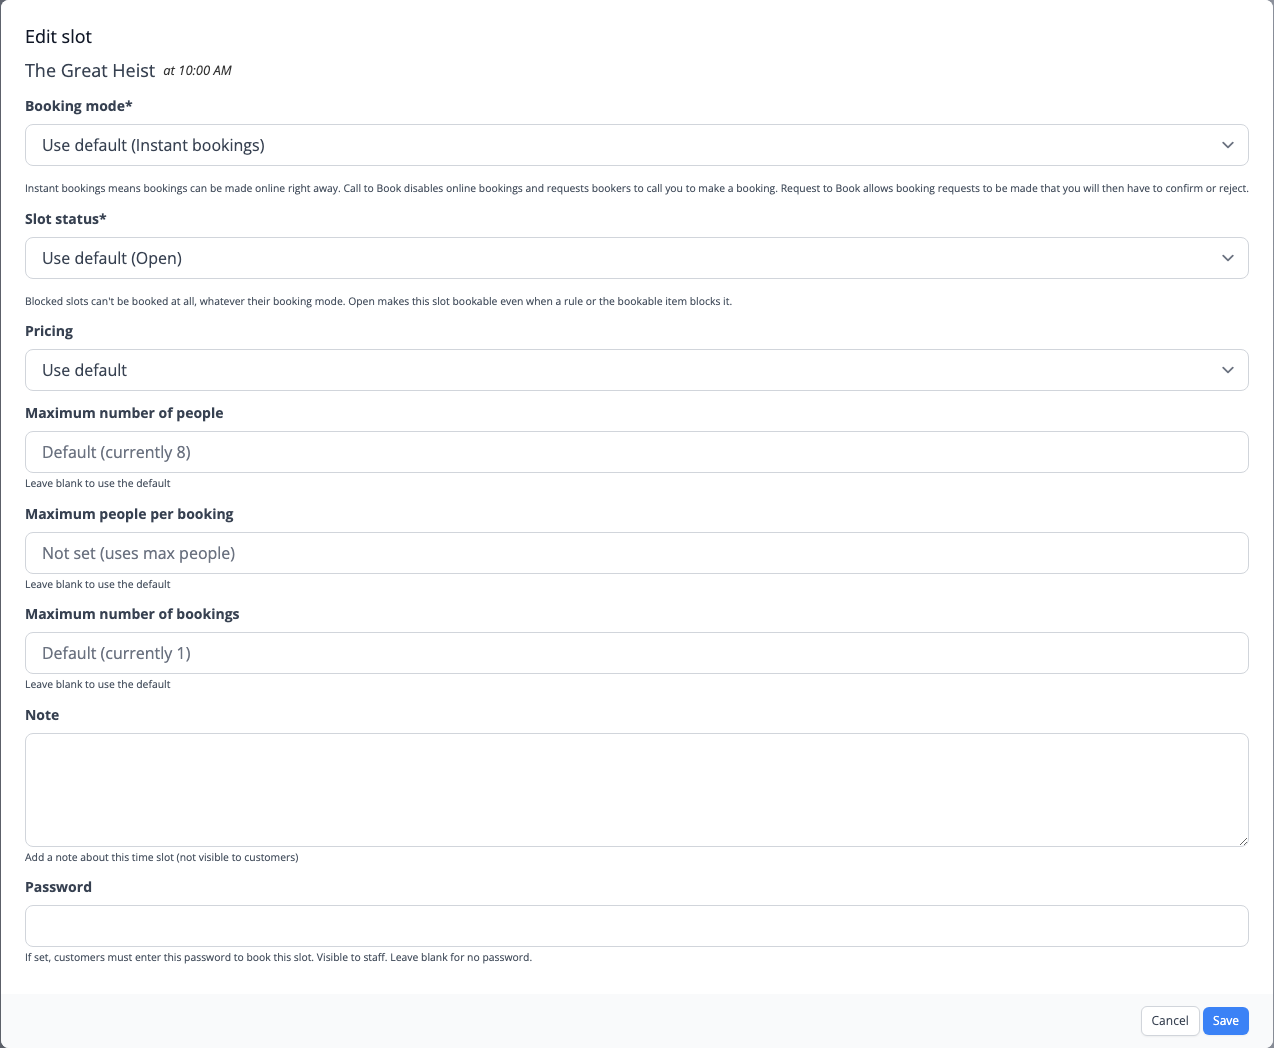
You can change:
- Booking mode — Override to Instant booking, Call to book, or Request to book. The dropdown shows "Use default" with the currently effective mode in brackets so you always know what will apply if you don't override.
- Slot status — Block the slot so it can't be booked at all, whatever its booking mode, or open it so it can be booked even when a rule or the bookable item blocks it.
- Pricing — Choose a different price group for this slot.
- Maximum people — Override the capacity for this slot. The placeholder shows the current default.
- Maximum people per booking — Override the per-booking limit.
- Maximum bookings — Override how many separate bookings this slot can take.
- Note — Add an internal note (not visible to customers). Useful for recording why a slot is blocked or has special settings.
- Password — Lock the slot so only someone you have given the password to can book it. The slot still appears in your booking widget, marked with a padlock and the word "Password", but customers must type the password to book. The password stays in place until you clear it.
Important: When you set a booking mode on an individual slot, it overrides everything — including your rules. If you've set a rule to change slots to "Request to Book" at short notice but a specific slot has been manually set to "Instant Booking", the rule won't apply to that slot. If a rule doesn't seem to be working on a particular slot, check here first. Set the booking mode back to "Use default" to let rules apply normally. The one exception is Staffing: if you offer Request to Book when staff can't cover a slot, an Instant Booking slot with nobody to run it still becomes a request.
Moving Slots
Click Move in the detail panel to reschedule a slot to a different date and time. You can set a new date, time, and duration. If the slot has bookings, you can choose which ones to move along with it.
Creating One-Off Slots
You can create extra time slots that aren't part of any schedule — useful for adding a single additional session on a particular day.
To create a one-off slot, use the create option from the calendar. Choose the bookable item, set a date, start time, and duration.
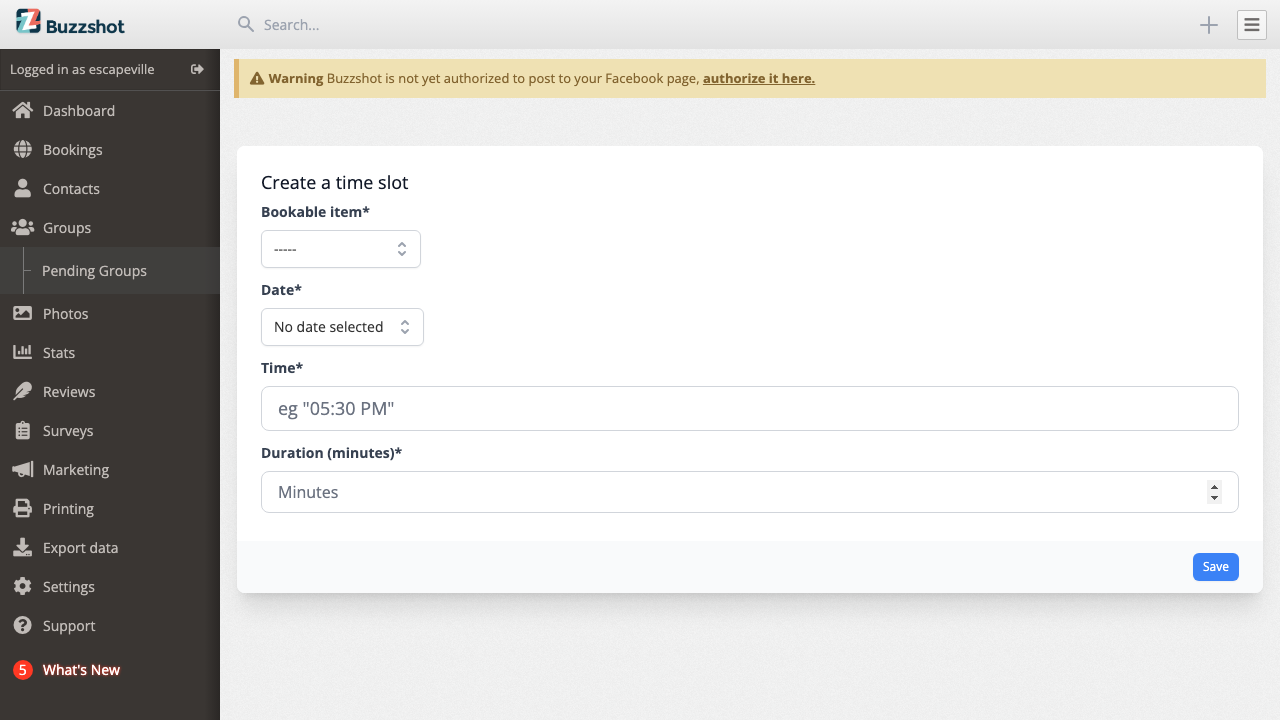
Note: New slots created this way default to "Instant Booking" mode rather than "Use default". If you have rules you want to apply to the new slot (such as request-to-book for short-notice bookings), remember to edit the slot afterwards and change its booking mode to "Use default".
Adding Bookings from the Calendar
To create a booking for a slot (e.g. for a walk-in customer or a phone booking), click on the slot to open the detail panel, then click Add Booking. This opens the booking creation form where you can select products and quantities for the customer.
Managing Carts
When a customer starts the booking process on your widget but hasn't completed it yet, their selected slot shows "In Cart" on the calendar. The detail panel shows a countdown timer for when the cart will automatically expire and release the slot.
If a cart appears to be abandoned (for example, a customer started booking but didn't finish), you can click Expire Now to release the slot immediately so it becomes available for others.
Bulk Operations
When you need to make changes to multiple slots at once, use the bulk selection tools.
Selecting slots: Click the checkbox in the top-right corner of any slot to select it. Use Shift+Click to select a range of consecutive slots. A blue bar appears at the top showing how many slots are selected, with a Select All option to select every visible slot.
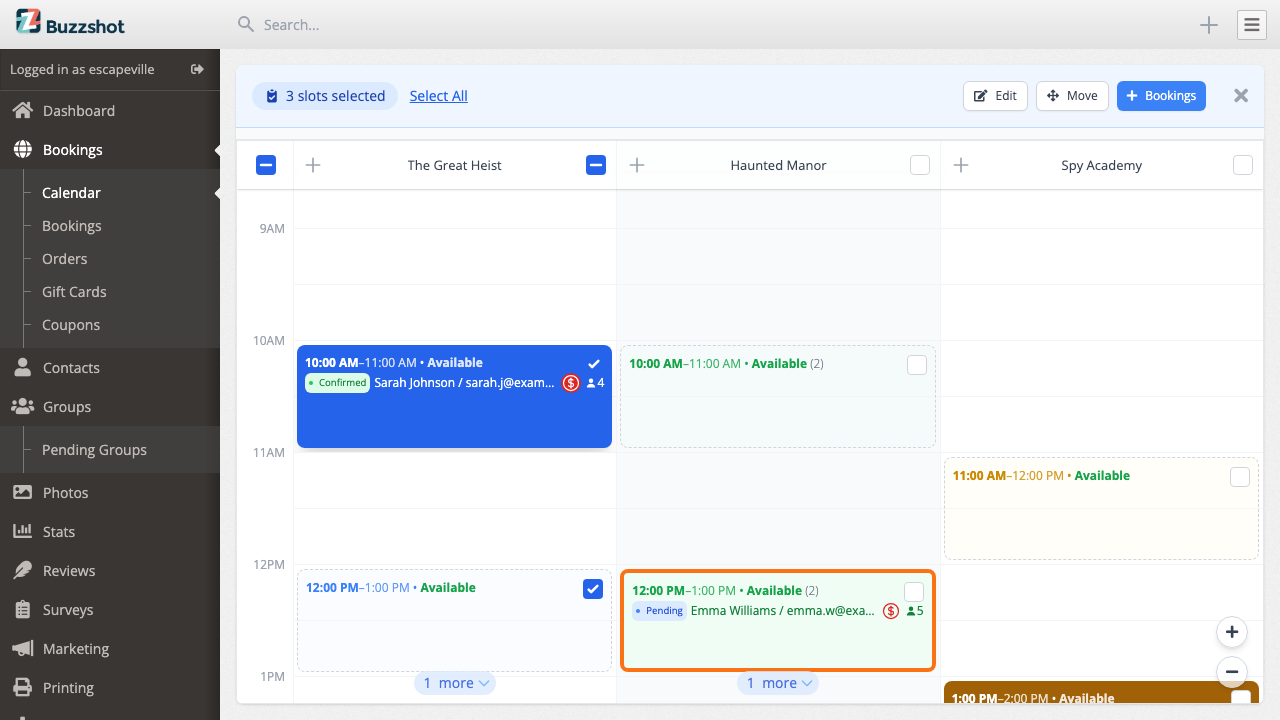
Once you've selected your slots, you have three actions available:
Edit — Update settings across all selected slots. Each field has a checkbox next to it — only tick the fields you want to change. Unticked fields are left as they are. This is useful for blocking all slots on a particular day or changing the pricing for an evening's sessions.
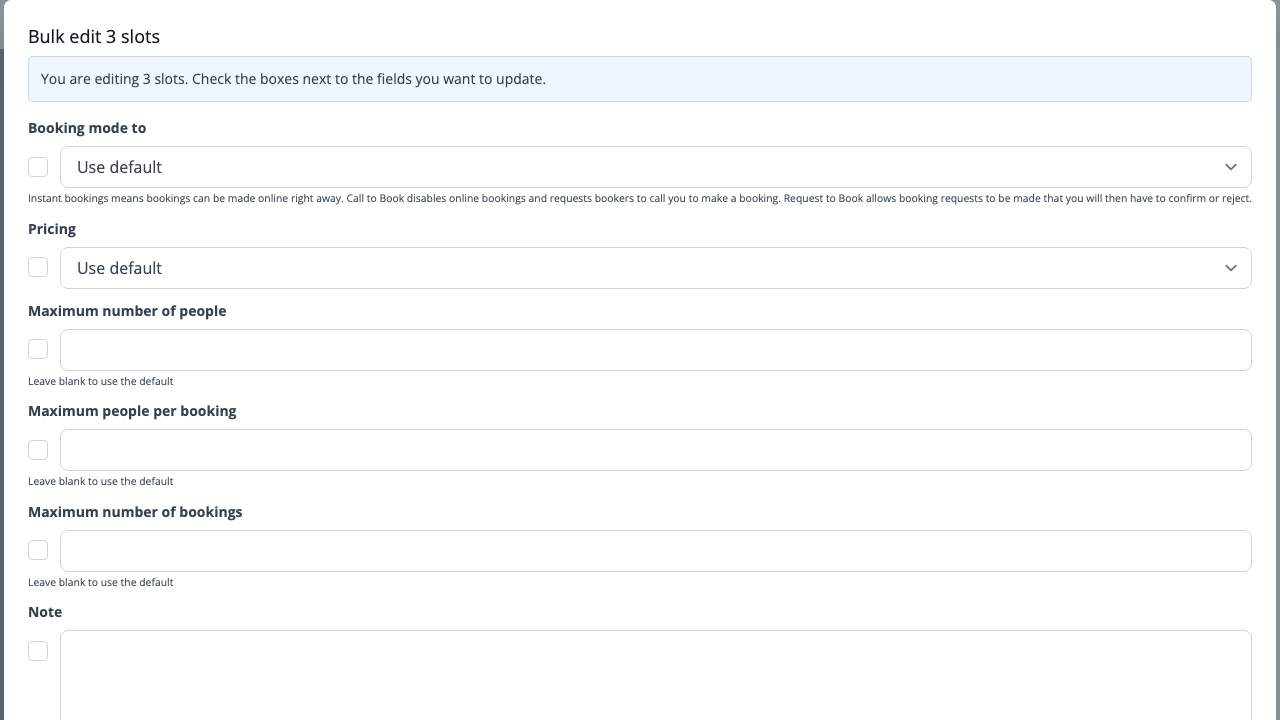
Move — Shift all selected slots by a set amount. You can change the date, adjust the time (e.g. move everything 30 minutes later), or change the duration. You can also choose whether to move any existing bookings along with the slots.
Bookings — Create bookings for multiple empty slots at once. Select the products and quantities, and a booking is created for each selected slot. Useful for block-booking sessions for a corporate event or group visit.
Tips and Common Scenarios
Blocking a day for maintenance: Select all slots on that day using the checkboxes, then click Edit and change the booking mode to "Blocked". Alternatively, for recurring closures or date ranges, set up a rule with a date condition — this is more reliable and doesn't require remembering to do it manually.
Handling a walk-in: Click on an available slot, then click Add Booking in the detail panel. Fill in the customer details and products.
A rule isn't working on a specific slot: Click on the affected slot and check the detail panel. If the booking mode shows a specific value (like "Instant booking") instead of the default, a per-slot override is taking priority over your rule. Edit the slot and set the booking mode back to "Use default".
Focusing on one room: Use the room filter in the control bar to show only the room you need. Shared resource columns are listed in the same filter. This is especially helpful on mobile where screen space is limited.
A slot shows "In Cart" but nobody's booking: A customer may have started the booking process and abandoned it. Open the slot details and check the cart expiry timer. If you need the slot available immediately, click Expire Now to release it.
Related Articles
- Schedules & Availability — Setting up your regular time slots, seasonal schedules, and per-slot overrides in detail.
- Rules — Automatically applying changes to slots based on conditions like time of day, day of week, or date range.
- Resources & Capacity: Sharing staff, rooms or equipment between bookable items.
- Capacity Schedules: Changing a shared resource's capacity by time of day, or for one day.